

7.0 Upgrading a Virtual Machine to UCX 7.0 and InfinityOne 4.0
Section Contents
7.1 Create a UCX Release 7.0 Virtual Machine
7.2 Prepare the New Instance
7.3 Prepare the existing UCX Release 6.0 system
7.4 Prepare the existing InfinityOne Release 3.0 system
7.5 Restore the system data to the new UCX 7.0 instance
7.6 Re-activate any Specific Settings
7.7 Switch SIP Trunks and users from the UCX Release 6.0 system to the new UCX Release 7.0 instance.
7.8 Complete the Update to InfinityOne
7.9 Update the Ticket
7.0 The Virtual Machine Upgrade Process
7.1 Create a UCX Release 7.0 Virtual Machine
Virtual images are only available through a request to the E-MetroTel Support ticketing system which will temporarily enable an image to be downloaded from a connection with a specific public IP address provided in the support ticket.
- Begin the process by updating the existing UCX 6.0 or UCX 5.0 software using the Software Update to ensure that the system has the latest available functionality.(It must include FreePBX version 2.11.3-66 or higher.)
- Open an E-MetroTel support ticket requesting to download a new UCX Release 7.0 virtual machine image, using the Serial Number and VPN IP address of the existing UCX 6.0 or UCX 5.0 instance. In the ticket, you must also provide the public IP address that will be used to download the image.
- After receiving a response with a download link from E-MetroTel support, download the virtual image using a connection from the public IP address identified to E-MetroTel in Step 1, above.
- Launch the new instance.
- Once the image has been installed and the UCX software is running in the virtual environment, register the new instance on our Remote Access network.
- Perform a Software Update on the new Release 7.0 virtual machine.
- Update the existing ticket (via the support portal, not by responding to the email) to provide the Remote Access VPN address assigned to the new instance when the system was registered. Do not replace the VPN address of the Release 6.0 system that was included when opening the ticket; instead, include the new address in the ticket text.
- Wait for a response from the E-MetroTel ticketing system indicating that E-MetroTel has captured the MAC address and Host ID of the new Release 7.0 instance and associated it with the existing UCX 6.0 or UCX 5.0 system's Serial Number.
After you have received the notification from the ticketing system you are ready for the next step.
7.2 Prepare the New Instance
Before transferring any data to the new instance, the UCX Release 7 system must be updated and licensed.
- Visit the System Activation page on the new instance to retrieve the system licensing data from the SN management tool. Just by visiting the page, the new instance will become associated with the Serial Number.
- Perform a Licence Retrieval on the Enter License page to get the updated Release 7 license.
7.3 Prepare the existing UCX Release 6.0 system
- Create a Backup of the existing UCX Release 6.0 or UCX 5.0 instance and download the backup to your PC.
7.4 Prepare the existing InfinityOne Release 3.0 system (if used)
If you are running InfinityOne on the UCX Release 6.0 system it must be backed up separately from the UCX backup.
- Follow the steps in section 3.0 Preparing to Update to InfinityOne 4.0 to ensure that all InfinityOne data backup is ready for use in InfinityOne Release 4.0 on the new UCX Release 7.0 instance.
7.5 Restore the system data to the new UCX 7.0 instance
- Perform a Software Update on the new UCX 7.0 system
- If you would like to have a "clean" backup of the UCX Release 7.0 system, perform a Backup now.
- Install any of the optional Addon packages that were configured in the UCX Release 6.0 or UCX 5.0 system
- Upload the UCX Release 6.0 backup to the new UCX Release 7.0 system using the Upload button on the System Tools / Backup/Restore page.
- Restore the backup by clicking the assocaited Restore button.
7.6 Activate any Specific Settings
E-MetroTel recommends that you review the basic configuration settings of the system after the UCX 7.0 Update has been completed. In addition, several of the automated tasks and configuration settings will need to be restarted.
7.5.2 Automated Cleanup
If the system was previously configured for any scheduled Automated Cleanup activity, the existing configuration, including any schedules, will be configured as per the original Release 6.0 or UCX 5.0 settings, however, they will be Disabled on startup. To restart the schedules, the Automated Cleanup service must be restarted following the instructions in the Automated Cleanup documentation.
7.5.3 Automatic Software Updates
E-MetroTel always recommends configuring Automatic Software Updates. These will be required to be set up for the new UCX Release 7.0 instance.
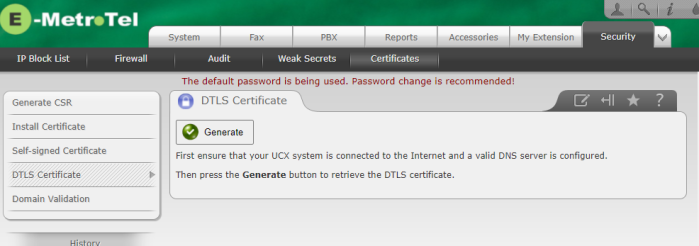
7.5.4 Install DTLS Certificate
If you are using InfinityOne you will need to create a new DTLS certificate to enable speech path between devices.
-
Navigate to Security / Certificates / DTLS Certificates

7.7 Switch SIP Trunks and users from the UCX Release 6.0 or UCX 5.0 system to the new UCX Release 7.0 instance.
Once you have completed all the settings on the new instance you are ready to begin moving the SIP trunks and telephony users to the new instance.
7.7.1 SIP Trunks
Ensure that any SIP trunks are enabled in order to be able to receiving incoming calls and placing outgoing calls.
- If these trunks were created using the IP Trunk Assistant, follow the instructions in the IP Trunk Assistant documentation for enabling these trunks.
- If these trunks were created using the Add Trunks page in the PBX / PBX Configuration / Trunks page, then enable the SIP trunks following the documentation in Adding SIP Trunks.
- Remember to disable any SIP trunks on the UCX 6.0 system so that the new UCX Release 7.0 instance can connect properly to the far end.
- If the IP Address of the new instance is not going to be changed to that of the old UCX Release 6.0 or UCX 5.0 system, you may need to change the configuration of the far-end device that the SIP trunk is connected to.
7.7.2 XSTIM IP Phones and DSM16s
If you will be changing the IP address of the new UCX Release 7.0 system to be the same as the old UCX Release 6.0 system, then there is no need to change any configuration for S1 address on XSTIM phones or DSM16s. If there is a new IP address associated with the new system, then each of these devices will be required to change the S1 address to that of the new system. For XSTIM phones, the S1 address can be changed manually or via the E-MetroTel Infinity Phones Provisioning tool.
7.7.3 FXS16s, PRI Gateways, 3rd party SIP Gateways and Telephones
If you will be changing the IP address of the new UCX Release 7.0 system to be the same as the old UCX Release 6.0 or UCX 5.0 system, then there is no need to change any configuration for the FXS16 and PRI cards or any third party SIP gateways or SIP telephones. If there is a new IP address associated with the new system, then each of these devices will be required to change their configuration programming to match.
7.8 Complete the Update to InfinityOne
The steps for completing the last step of the process, the update to InfinityOne Release 4.0, are documented in section 6.0 Completing the Update to InfinityOne 4.0
7.9 Complete the UCX Release 6.0 System Retirement
After verifying that all functionality is working as expected on the new Release 7.0 system:
- Unregister the Release 6.0 system from the VPN connection (UCX Remote Access) to free up the VPN IP Address for future systems.
- Update the same support ticket once more, advising E-MetroTel that the old instance can be retired from our licensing system.
7.10 Backup the new configurations
- Perform a Backup of the new fully updated Release 7.0 configuration.
- Perform a backup of the InfinityOne 4.0 configuration by refering to InfinityOne - Backup and Restore