

Infinity SIP - Making a Call
Features with an asterisk * are specific to the UCx Server and the description provided applies only if the phone is connected to a UCx Server. The UCx default feature code values are used in the examples given.
Off-hook dialing
- Lift handset.
- Dial the number.
On-hook dialing
- Press the Line key.
- Dial the number.
Hands-free dialing
- Press the Speaker key.
- Dial the number.
Headset dialing
- If Headset key is NOT LIT. press the key. If key is already LIT, go directly to step 2.
- Press button on Headset.
- Dial the number.
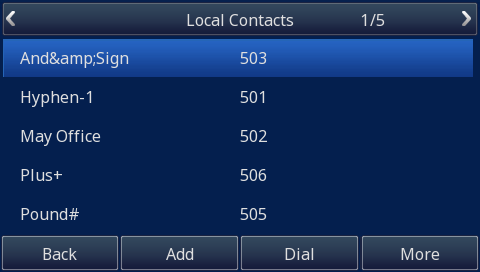
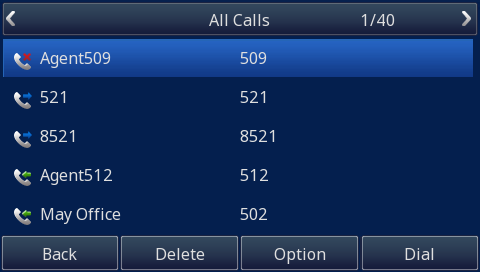
Local Directory
The local directory stores contact/blacklist information on the phone and can support up to 1000 entries.
Phone
-
Select Menu -> Directory -> Local
OR
Press the Directory soft key. - From the directory, you can add/delete/modify the entries. (Press the More softkey to see more options.)
-
Use the Up/down navigation keys to select the entry and press the Dial soft key to dial the number.
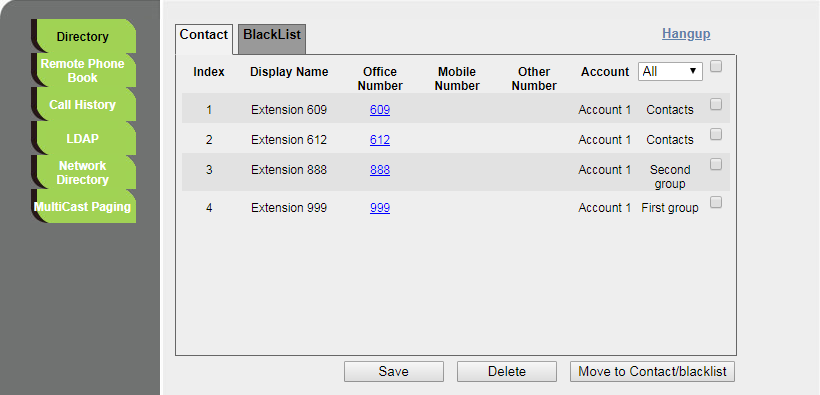
Web
- Navigate to Directory -> Directory page.
- Click on the number link to dial the number.
-
Click on the Hangup link at the top right corner to disconnect the call.

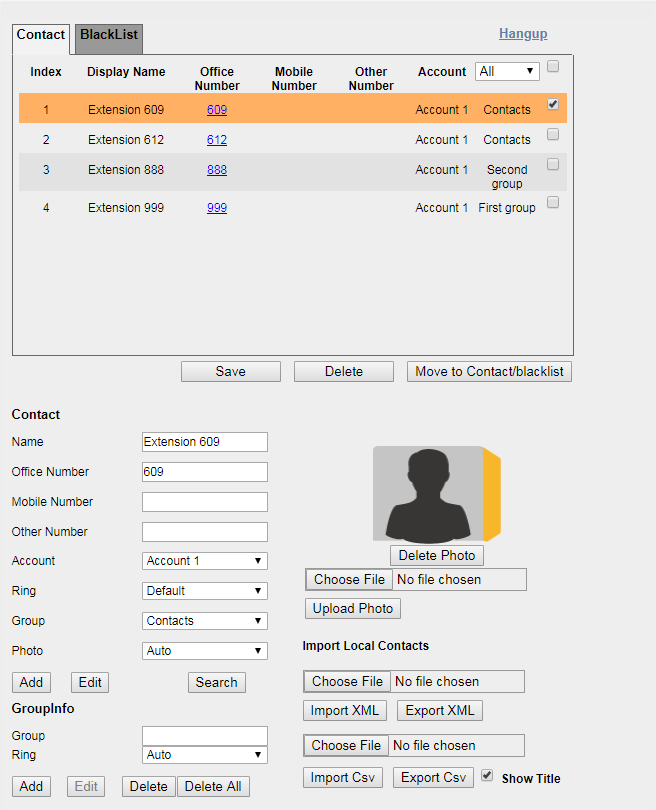
Managing Contacts
From the directory, you can add/delete/modify/move the entries. Contacts can also be imported into the directory via XML or CSV files.
To modify a contact:
- Click on the index row to select the contact, the details of the contact will be displayed below.
- Make changes to the contact details and click on the Edit button, followed by the Save button.
To delete a contact:
- Click on the index row to select the contact.
- Click on the Delete button.
To move a contact to the BlackList:
- Click on the index row to select the contact.
- Click on the Move to Contact/blacklist button.
To add a contact:
- Fill in the contact details and click on the Add button, followed by the Save button.
System Directory *
To make a call using the UCx system’s telephone directory:
- Dial # or *411.
- Use the dial pad to enter the first 3 letters of either the first or last name of the person you want to call.
Call History
Phone
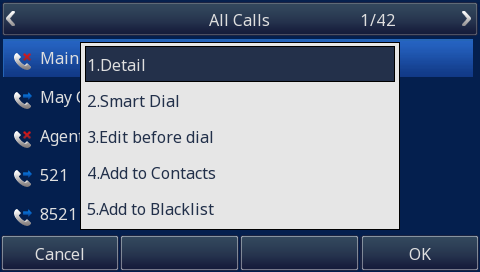
- Press the History soft key.
- Use the Up/down navigation keys to view call log entries.
-
Press the Option soft key to access other functions.
-
Press the Dial soft key to call the phone number from the selected call log entry.
Web
- Navigate to Directory -> Call History page.
-
Select the desired list: Dialed List, Missed List, Received List, Forwarded List.
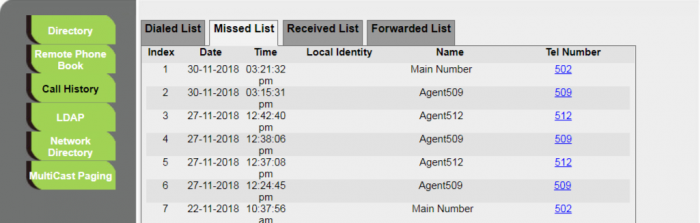
- Click on the Tel Number link to dial the number.

Last Number Redial
- Press the Redial key.
- A call will be made to the last number dialed from the phone.
Hotline
The hotline feature allows the user to make a call simply by lifting the handset or pressing the Line key/Speaker key/Headset button and the configured hotline number will be dialed automatically.
Note that the hotline feature only applies to the first active call/line. If the second line is activated while the first line is active, a normal call can be made on the second line.
Phone
To configure hotline from the phone:
- Select Menu -> Features -> Hot Line
- Enter the Hotline Number
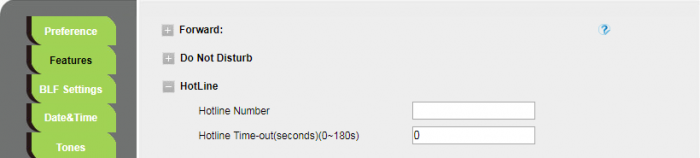
Web
To configure hotline from the web interface:
- Navigate to Setting -> Features -> HotLine page
-
Enter the Hotline Number

To make a call:
- Lift the handset or press the Line/Speaker key or press button on Headset (Headset key must be LIT).
- The configured hotline number is dialed immediately
Intercom (Voice Call) *
To allow the phone to auto answer an intercom call, you have to first enable auto answer by call-info:
- From the web interface, navigate to Profile -> Advanced page
- Set Allow Auto Answer By Call-Info to Yes
There are two methods to configure an intercom key. If the intercom extension is fixed, then use Method 1. If the intercom extension is unknown and will be entered by the user, then use Method 2.
Method 1 (intercom extension is fixed)
Phone
To configure an intercom key via phone interface:
- Select Menu -> Features -> Function -> Line
- Use the Left/Right navigation keys to select Intercom in the Type field
- Enter *80 + EXTENSION in the Value field
- Enter a Label
- Select the Account ID
- Press the Save soft key
Web
To configure an intercom key via web interface:
- Navigate to Function Keys -> Line Key page
- Select Type Intercom for the desired key
- Enter *80 + EXTENSION in the Value field
- Enter a Label
- Select the Account
- Click the SaveSet button
To make an intercom call:
- Press the Intercom key
- Speak into the handset and your voice will be heard on the dialed EXTENSION’s speaker
Method 2 (intercom extension entered by the user)
Phone
To configure an intercom key via phone interface:
- Select Menu -> Features -> Function -> Line
- Use the Left/Right navigation keys to select Prefix in the Type field
- Enter *80 in the Value field
- Enter a Label
- Press the Save soft key
Web
To configure an intercom key via web interface:
- Navigate to Function Keys -> Line Key page
- Select Type Prefix for the desired key
- Enter *80 in the Value field
- Enter a Label
- Click the SaveSet button
To make an intercom call:
- Press the Prefix key followed by the EXTENSION number
- Speak into the handset and your voice will be heard on the dialed EXTENSION’s speaker
Paging *
To allow the phone to auto answer a paging call, you have to first enable auto answer by call-info:
- From the web interface, navigate to Profile -> Advanced page
- Set Allow Auto Answer By Call-Info to Yes
Phone
To configure a paging key via phone interface:
- Select Menu -> Features -> Function -> Line
- Use the Left/Right navigation keys to select Paging in the Type field
- Enter the PAGE GROUP number in the Value field
- Enter a Label
- Select the Account ID
- Press the Save soft key
Web
To configure a paging key via web interface:
- Navigate to Function Keys -> Line Key page
- Select Type Paging for the desired key
- Enter the PAGE GROUP number in the Value field
- Enter a Label
- Select the Account
- Click the SaveSet button
To make a paging call:
- Press the Paging key.
- Speak into the handset and your voice will be heard on the speakers of the extensions that belong to the page group.
BLF (Busy Lamp Field)
A BLF key can act as a speed dial key to directly call the monitored extension.
Phone
To configure a BLF key via phone interface:
- Select Menu -> Features -> Function -> Line
- Use the Left/Right navigation keys to select BLF in the Type field
- Enter the target number in the Value field
- Enter a Label
- Select the Account ID
- Press the Save soft key
Web
To configure a BLF key via web interface:
- Navigate to Function Keys -> Line Key page
- Select Type BLF for the desired key
- Enter target number in the Value field
- Enter a Label
- Select the Account
- Click the SaveSet button
To make a call to the monitored extension:
- Press the BLF key and the monitored extension is dialed immediately.
Speed Dial
Phone
To configure a speed dial key via phone interface:
- Select Menu -> Features -> Function -> Line
- Use the Left/Right navigation keys to select Speed Dial in the Type field
- Enter the target number in the Value field
- Enter a Label
- Select the Account ID
- Press the Save soft key
Web
To configure a speed dial key via web interface:
- Navigate to Function Keys -> Line Key page
- Select Type Speed Dial for the desired key
- Enter target number in the Value field
- Enter a Label
- Select the Account
- Click the SaveSet button
To make a call:
- Press the Speed Dial key and the target number is dialed immediately.
System Speed Dial *
The UCx administrator can program system wide speed dial locations (a.k.a. speed dial codes). These system speed dial codes will be available to all users.
To make a call using system speed dial:
- Dial *0 + SPEED DIAL CODE.
(For example, if the speed dial code is 100, dial *0100.)
User Speed Dial Override
If a user attempts to program a speed dial location that is already in use by the system, the user will be notified that the speed dial location is already in use.
The user can choose to override the system's number with the user's own number for this location.
All other users will not be affected; they will continue to have access to the speed dial code and number programmed by the UCx administrator.
If the user wants to revert back to the system speed dial number, simply delete the user's speed dial entry.
Programming User Speed Dial
- Dial *75 to enter the user speed dial menu.
- Enter the speed dial location and press the # sign.
- Follow the audio prompts.