

SIP Trunking Between BCM and the UCx Server.
This page describes how to set up a SIP trunk between a UCx system and BCM. There are two main options for the authentication of the connection:
- Using user names and passwords
- Using IP addresses or host names of the two systems
The simpler method - using the IP addresses - is described below.
Configuration Example
For the configuration example in the sections below, the configuration of the UCx and BCM systems would be as follows:
-
BCM Configuration
- IP Address: 192.168.1.100
- SIP Port: 5060
- Extensions: 221 - 239
-
UCx Configuration
- IP Address: 192.168.1.200
- SIP Port: 5060
- Extensions: 600 - 699
Configuration of UCx
SIP Settings
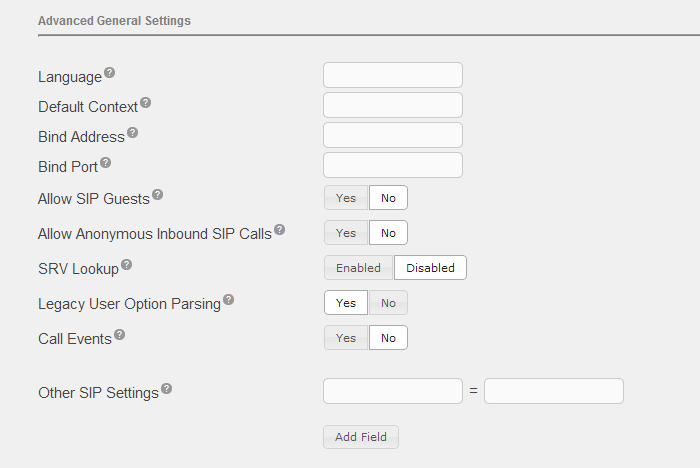
Recent releases of BCM and CS1000 add user options tags to the destination number field in SIP messages. These tags are by default included in the DID string used by UCx together with the destination digits causing failures to match inbound routes. To make sure these tags are removed before using the destination number, the Legacy User Option Parsing option must be enabled on the SIP Settings page of your UCx system.
Navigate to the SIP Settings page:
- Scroll down to the Advanced General Settings section, locate the field Legacy User Option Parsing and set the value to Yes
- Press the Submit Changes button to save the configuration.
SIP Trunk
Use the Adding SIP Trunks procedure to add a new SIP trunk
- In the Trunk Name field under General Settings, enter a descriptive name for the trunk, for example BCM (this name will be used in the list of trunks in the UCx management user interface)
- In the Trunk Name field under Outgoing Settings, enter a unique trunk name, for example BCM (this name will be used for outgoing calls in the UCx dial plan)
- In the Peer Details text field under Outgoing Settings, enter the following information:
host=192.168.1.100
type=peer
trunk=yes
qualify=yes
insecure=port,invite
deny=0.0.0.0/0.0.0.0
permit=192.168.1.100/255.255.255.255
type=peer
trunk=yes
qualify=yes
insecure=port,invite
deny=0.0.0.0/0.0.0.0
permit=192.168.1.100/255.255.255.255
Outbound Route
Using the Adding Outbound Routes procedure to add a new outbound route to the BCM system.
- In the Route Name field, enter a descriptive name for the route, for example BCM
- Under Dial Patterns that will use this Route, in the match pattern field enter 2[2-3]X (this pattern matches the BCM extension range)
- Under Trunk Sequence for Matched Routes, select the trunk BCM (created in the previous step)
With this outbound route configuration, dialing 22X or 23X from UCx phones sends the calls over the SIP trunk BCM to the BCM system.
Inbound Route
To allow extensions on the BCM system to call UCx extensions, there is no need to add an inbound route if you configure the BCM system to send UCx extensions numbers without any prefix/suffix. If you decide to send extra digits or for other types of calls (such as tandem calls over UCx trunks), you would need to configure appropriate inbound route(s).
Configuration of BCM
Use Business Element Manager to connect to your BCM system and configure the system as follows.
SIP Trunk
- Go to Configuration - Resources - IP Trunks - SIP Trunking and select the Private tab
- Press the Add... button to add a new route and enter the following information:
|
Field
|
Value
|
|---|---|
| Name | UCx |
| Destination Digits | 6 (the first digit of UCx extensions) |
| Domain | ucx50.local (domain name of the UCx suerver) |
| IP Address | 192.168.1.200 |
| Port | 5060 |
| GW Type | Other |
| MCDN Protocol | None |
- Press the OK button to save the new route
Outbound Route
- Go to Configuration - Telephony - Dialing Plan - Routing and select the Routes tab
- Press the Add... button to add a new route and enter an unused route number - for example 006 (to match the routing code to UCx)
- Double-click on the Use Pool value of the new route (006) and change the value to BlocA (the line pool with your SIP trunks)
- The DN Type value of the new route (006) should be set to Private by default (if that's not the case, change the value to Private)
- Go to Configuration - Telephony - Dialing Plan - Routing and select the Destination Codes tab
- Press the Add... button to add a new destination code and enter the first digit of UCx extensions 6
- In the Normal Route field for the destination code 6, enter the number of the new route (006)
- In the Absorbed Length field for the destination code 6, enter 0 (no digits are absorbed)
Notes
With the BCM configuration described above, dialing 6XX from a BCM phone triggers the following actions:
- The system uses the routing code 6
- Routing code 6 sends the call over the normal route 006
- Route 006 uses the line pool BlocA with SIP trunks
- SIP trunks match the first digit 6 with the destination digits of the UCx route and send the call to the UCx system