

XSTIM - Customizing Phone Display Screen
Table of Contents
Labels
If the key labels on your XSTIM phone are not displaying correctly, reset your phone to factory settings.
- From the phone's web interface, navigate to Management -> Configuration page.
- Click on Download Xml File button to save the phone's configuration on your local PC.
- Navigate to Management -> Upgrade page.
- Click on Reset to Factory button.
- Wait for the phone to complete its reboot.
- Login to the phone's web interface and navigate to Management -> Configuration page.
- Click on Choose File and locate the XML configuration that was saved earlier.
- Click on Restore Xml Configuration button.
- Wait for the phone to complete its reboot.
Display Text
There are 3 settings that control the text displayed on the Web interface and the phone's LCD screen. Navigate to Setting -> Preference page:
- Web Language - Select the desired language from the drop-down list. The default is English.
- LCD Font Size - Select from the drop-down list Normal or Large, all text displayed on the screen including labels will be affected.
-
CallID Font Size - Select from the drop-down list:
- Auto - CallID font size will depend on the LCD Font Size selected.
- Large - CallID font size will always be large.

Background Display
Backlight
By default the backlight timeout period is set to zero, that means never timeout between 7:00 AM and 9:00 PM.
Users can configure a different timeout period by updating the Backlight Time field to a value greater than zero. Note the value is stored in seconds.
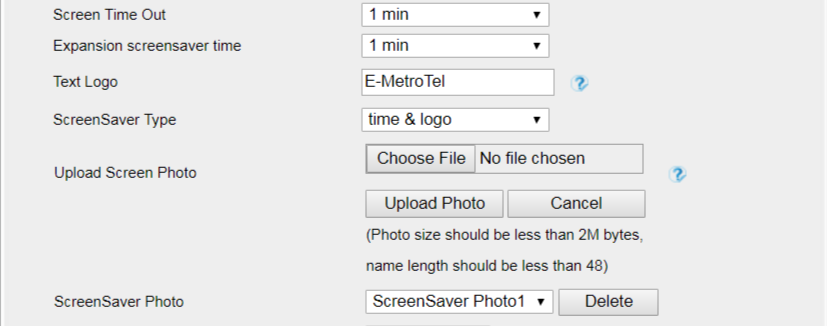
Screen Saver
Users can configure the screen display timeout period and select the preferred screen saver mode.
To change the timeout period:
- Navigate to Setting -> Preference page.
-
Update the following fields:
- Screen Time Out - Select from the drop-down list the desired timeout period or Off to disable screen saver for the phone.
- Expansion screen saver time - Select from the drop-down list the desired timeout period or Off to disable screen saver for the expansion modules.
- Click on SaveSet button.
To change the screensaver type:
-
In the ScreenSaver Type field, select the type from the drop-down list.
- If choosing type time & logo, fill in the Text Logo field.
- Click the SaveSet button.
To upload your own screensaver photo:
- In the Upload Screen Photo field, click Choose File and select the desired JPG or BMP file.
- Click on Upload Photo button.
- When the upload is complete, go to ScreenSaver Type field and the newly uploaded photo will be available for selection in the drop-down list.
To delete a screensaver photo:
- In the ScreenSaver Photo field, select the desired photo from the drop-down list and click on the Delete button.
Wallpaper
You can still upload your own wallpaper for the phone by navigating to the Setting -> Preference page.
- In the Upload Wallpaper field, click Choose File and select the desired JPG or BMP file.
- Click on Upload Photo button.
- When the upload is complete, go to Wallpaper field and the newly uploaded photo will be available for selection in the drop-down list.
To delete a wallpaper photo:
- In the Delete Wallpaper field, select the desired photo from the drop-down list and click on the Delete button.
Limitations
When using your own wallpaper on Xstim phones, please be aware of the following limitations:
- After applying the new wallpaper, the phone display does not update immediately. Double press the Conference/Menu key, then press the Back softkey to exit. This will force a refresh of the LCD screen.
- The displayed text are white, so a light coloured wallpaper may render the displayed text unreadable. Recommend choosing a dark coloured wallpaper.
- The key labels are opaque and will cover most of the background wallpaper especially on a 5006 phone.
Supported Resolution
The following table shows the supported resolution for screen saver and wallpaper images.
| Phone model | Recommended resolution | Maximum resolution | File size |
|---|---|---|---|
| 5004 / 5006 / 5008 | 320 x 240 | 480 x 360 | < 100 KB |
| 5010 / 5010W | 480 x 272 | 720 x 408 | < 100 KB |
Bulk Provisioning Screensaver and Wallpaper
For administrators who want to upload screen saver or wallpaper images to multiple phones, there are 2 methods:
WEB INTERFACE
- Upload the desired image to the UCX Server, tftpboot directory. (e.g. newimage.jpg)
-
From the phone's web interface, navigate to Management -> Auto Provision page and configure the following fields to point to the UCX server tftpboot directory (e.g tftp://192.168.1.200/newimage.jpg):
- Screensaver Server URL = tftp://<UCX IP address>/<image filename> (The image will be stored as ScreenSaver Photo 1.)
- Wallpaper Server URL = tftp://<UCX IP address>/<image filename> (The image will be stored as Wallpaper6.)
- Click on SaveSet button to save the configuration.
- To provision the phones immediately with the new images, click on the Autoprovision Now button.
- Navigate to Setting -> Preferences page.
- For Screensaver Type, select Screensaver Photo1 and for Wallpaper, select Wallpaper6.
- Click the SaveSet button.
CLOUD PROVISIONING TOOL
- Upload the desired image to the UCX Server, tftpboot directory. (e.g. newimage.jpg)
-
Add the phones to the Cloud Provisioning Tool with the following parameters configured:
- Screensaver Server URL = tftp://<UCX IP address>/<image filename> (The image will be stored as ScreenSaver Photo 1.)
- Wallpaper Server URL = tftp://<UCX IP address>/<image filename> (The image will be stored as Wallpaper6.)
- Login to the phone's web interface and navigate to Management -> Auto Provision page. Make sure the Configuration Server Path is set to repo.uc-x.org/infinity.cfg.
- To provision the phones immediately with the new images, click on the Autoprovision Now button.
- Navigate to Setting -> Preferences page.
- For Screensaver Type, select Screensaver Photo1 and for Wallpaper, select Wallpaper6.
- Click the SaveSet button.