

High Availability - Installation and Configuration Rls 6.0
Introduction
UCX High Availability Replicated Configuration (HARC) is a software feature that creates UCX redundancy in a cluster of two UCX instances designated as Active Node and Standby Node. The purpose of this feature is to protect against outages due to UCX server failures, not for protection against network outages. This implies that the two UCX servers should be colocated with as few active network components between the two systems as possible.
In the HARC application, the two UCX servers are joined into a cluster and appear to the administrator, users and all devices that communicate with the cluster as a single UCX system. For communication and maintenance purposes, all actions are performed from the Active node via the Cluster IP address If the Active Node server is not available or if there is failure at any UCX component software level then the Standby Node will take over and become the Active node.
For HARC functionality the Standby node must have the same count of licensed extensions as for the Active node. To cost-effectively facilitate the licensing of the Standby node, E-MetroTel has introduced a reduced-price extension license specifically for HARC configurations: the order code is UCXHARCEXT-1 (please contact your E-MetroTel representative for pricing and additional details).
Both UCX servers must be on the same physical layer 2 network/subnet. A failure of any active networking devices between the two UCX servers can result in service disruption and database corruption in situations where the two servers remain operational but the communication path between the two is lost. UCX HARC can be implemented on UCX Appliances, on UCX Cloud and on UCX virtual instances. The UCX HARC software can be architected in combination with the UCX Survivable Remote Gateway (SRG) functionality to increase the overall availabiliity of telephony services across geographically disperse locations.

Note that the High Availability cluster configuration transfers control of all UCX functionality from the active node to the standby node when required. Since physical trunk interfaces cannot be connected to both units at once, High Availability functionality cannot be configured on UCX systems with internal trunk cards (or for systems that are licensed for internal trunk cards).
Prerequisites
The following checklist can be downloaded by click the link at the bottom of this page.
Configuration
Step One - Complete Prerequisites
Follow the prerequisites checklist above and ensure all the prerequisites are met. The prerequisite document is available as a download using the link at the end of this document.
The following are links to documentation required to support the configuration required in some of the prerequisite steps:
-
IP Addressing
- This must be done for both UCX systems. Review the information contained in Step Two - IP Address Planning of this document before configuring the systems.
-
Install license
- The HARC License must be installed for both UCX systems. The Product Code shown in the Licenses / License Details page on each system must contain the AS tag (refer to License Details for more information).
-
Set password
- Note that once the systems are configured as a cluster, the initial password will be that of the designated Primary system. Password changes of the cluster subsequent to that will be propagated to both individual systems.
-
Register on VPN
- Each of the two systems will continue to be connected to the Support VPN, so registration must be done prior to creating the cluster.
-
Update software
- Note that it is important that each of the systems are updated using the same software repository. On each of the systems, press the Set Source button on the Updates page on the System tab. This flushes the update cache on the UCX server and reloads the mirror list for both servers, effectively resetting the list. Afterwards, start the Software Update.
-
Backup servers
- This should always be performed when making major changes to the system configuration. Also note that the once the two systems are configured in the High Availability cluster, the Secondary node programming will be overwritten by the Primary node settings.
-
Set date and time
- You will not be able to initiate the High Availability cluster unless the timezones match.
-
Configure SMTP settings
- Ensure SMTP settings on both servers are configured and tested to ensure they are both working correctly prior to initiating the High Availability cluster.
Step Two - IP Address Planning
If you are adding the HARC functionality to an existing UCX deployment, up-front planning of how to manage the IP Addressing of the nodes can save significant time by minimizing the time spent reconfiguring all other devices, external interfaces, and applications to accommodate the Cluster IP Address. Likewise, if you are deploying the HARC functionality on a new installation but want to validate the UCX operation prior to enabling HARC, time can also be saved using the same IP Address planning.
IP Addressing Strategy
The HARC configuration requires three IP Addresses - one for each of the cluster nodes, and one for the cluster itself.
- If you already have a working UCX configured using its default IP Address 192.168.1.200, then all connected devices, external interfaces and applications are already programed or configured to communicate with that address. While this UCX will be used as the Primary Node, the existing Address should be considered to be the final Cluster IP Address.
- Set up a second UCX with its own IP Address such as 192.168.1.202; this will be the Secondary Node IP Address.
- Choose another address, such as 192.168.1.201, for what will be ultimately become the Primary Node IP Address.
- After all connected devices, external interfaces and applications are verified to be functional with the existing UCX but prior to actually enabling the HARC functionality, change the IP Address of the first system to the new Primary Node IP Address.
- After completing Step Three below, configure the IP Addressing of the on the Cluster Setup page as shown in Step Four, below.
Step Three - Install package
Install the ucx-ha package on both UCX Servers:
- Login to the UCX Web-based Configuration Utility.
- From the System tab, select Updates.
- From the left side column, select Packages.
- Click on Show Filter.
-
Perform this step to verify mscs package is NOT installed:
- In the Name field, enter mscs and click on Search
- If the mscs package is installed then click on the Uninstall link, otherwise skip and go to the next step
- Wait for the system to respond with a successful uninstall message
- In the Name field, enter ucx.
- Under Status pull-down, select All.
- Find the line item with ucx-ha (Package Info = "UCX High Availability Cluster")
- Click on the Install link to install the ucx-ha package.
- Wait for the system to respond with a successful install message.
- A High Availability tab will open on the top menu.
- Repeat this process for both UCX Servers.
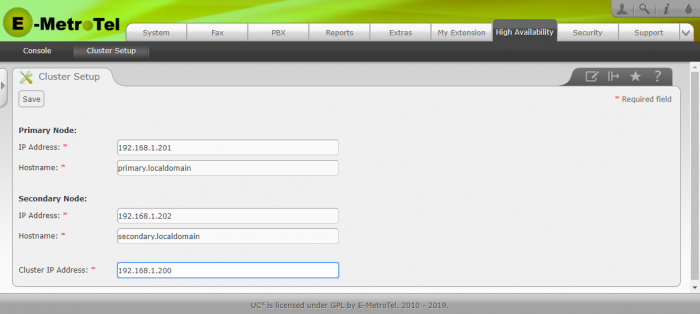
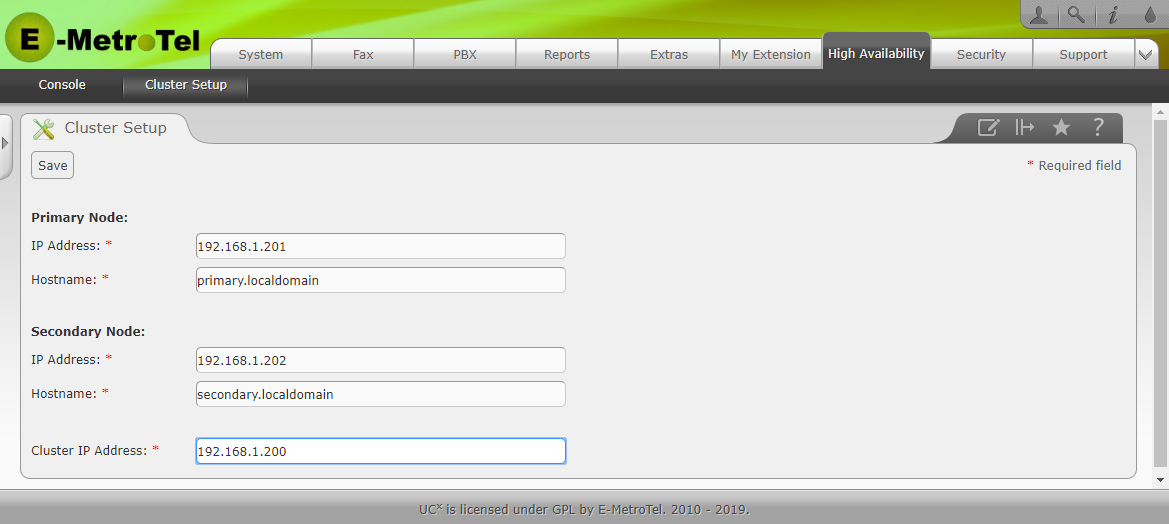
Step Four - Setup Cluster
- Login to the UCX Web-based Configuration Utility of the first UCX Server (Primary node).
- Click on the High Availability tab.
-
Fill in all the required fields according to the prerequisites checklist and click on the Save button. Note that the Hostnames that you enter here will over-write the names already entered in the Network page on the System tab on the two UCX servers.
-
If there are any package mismatches between the two servers, an error message will be displayed. Resolve the package differences and repeat the cluster setup again.

-
Once the cluster has been successfully setup, a message will be displayed.

- Wait for both servers to complete the reboot, then login to the UCX Web-based Configuration Utility using the Cluster IP address.


Step Five - Select Active Node
- Login to the UCX Web-based Configuration Utility using the Cluster IP address.
-
Click on the High Availability tab.

-
Under the Action column, click on the Takeover button of the node you want as the active node.

-
The resources will take a few minutes to synchronize. Once the synchronization is complete, the Action column will show the Standby button for the active node.


Active - Standby Failover
When the cluster loses connection to the active node, it will automatically failover to the standby node.

The HA resources will take some time to transition to the new active node. Once the transition is complete, the Standby button under the Action tab will be displayed.

Upload file: