

InfinityOne - Adding Users
Before You Begin
Default Roles and Channels
Depending on the method used to add a user, the default role assigned to the new user and the default channels joined depends on what is configured under Administration -> Accounts.
To view and make changes:
- Login using an administrator account.
- Navigate to Administration -> Account page.
- Click to EXPAND the Registration section.

| Field | Description |
|---|---|
| Default Registration Roles |
Default value is guest. This is the default role when a user is added via Self-Registration. |
| Default Guest Account Rooms |
This is the list of default channels for guest accounts. To remove all channels and leave it blank, enter a space character. |
| Default Invitation Roles |
Default value is user. This is the default role when a user is added By Invitation. |
| Invited users join default channels |
Default value is True. This is to allow invited users to automatically join the defined default channels. |
Adding Users
InfinityOne accounts are required for each user connecting via the desktop application, mobile app, or web browser interface. In fact, a user can access InfinityOne from any of these interfaces with the same user account. For telephony applications, E-MetroTel strongly encourages using either the InfinityOne desktop application or the InfinityOne mobile app. An account must be created for each user regardless of which way they plan to access the InfinityOne server.
There are three methods to add users:
Method 1: Self Registration
Send the InfinityOne URL to all users. (For example: https://ucx.infinityone.app:21326)
- The URL will take users to the login page.
- Users can click on the Register a new account link on the login page to register themselves.

You can control the privileges associated with Self Registration users and the channels that they have access to through the Default Registration Roles and the Default Guest Account Rooms fields. See section describing Default Roles and Channels.
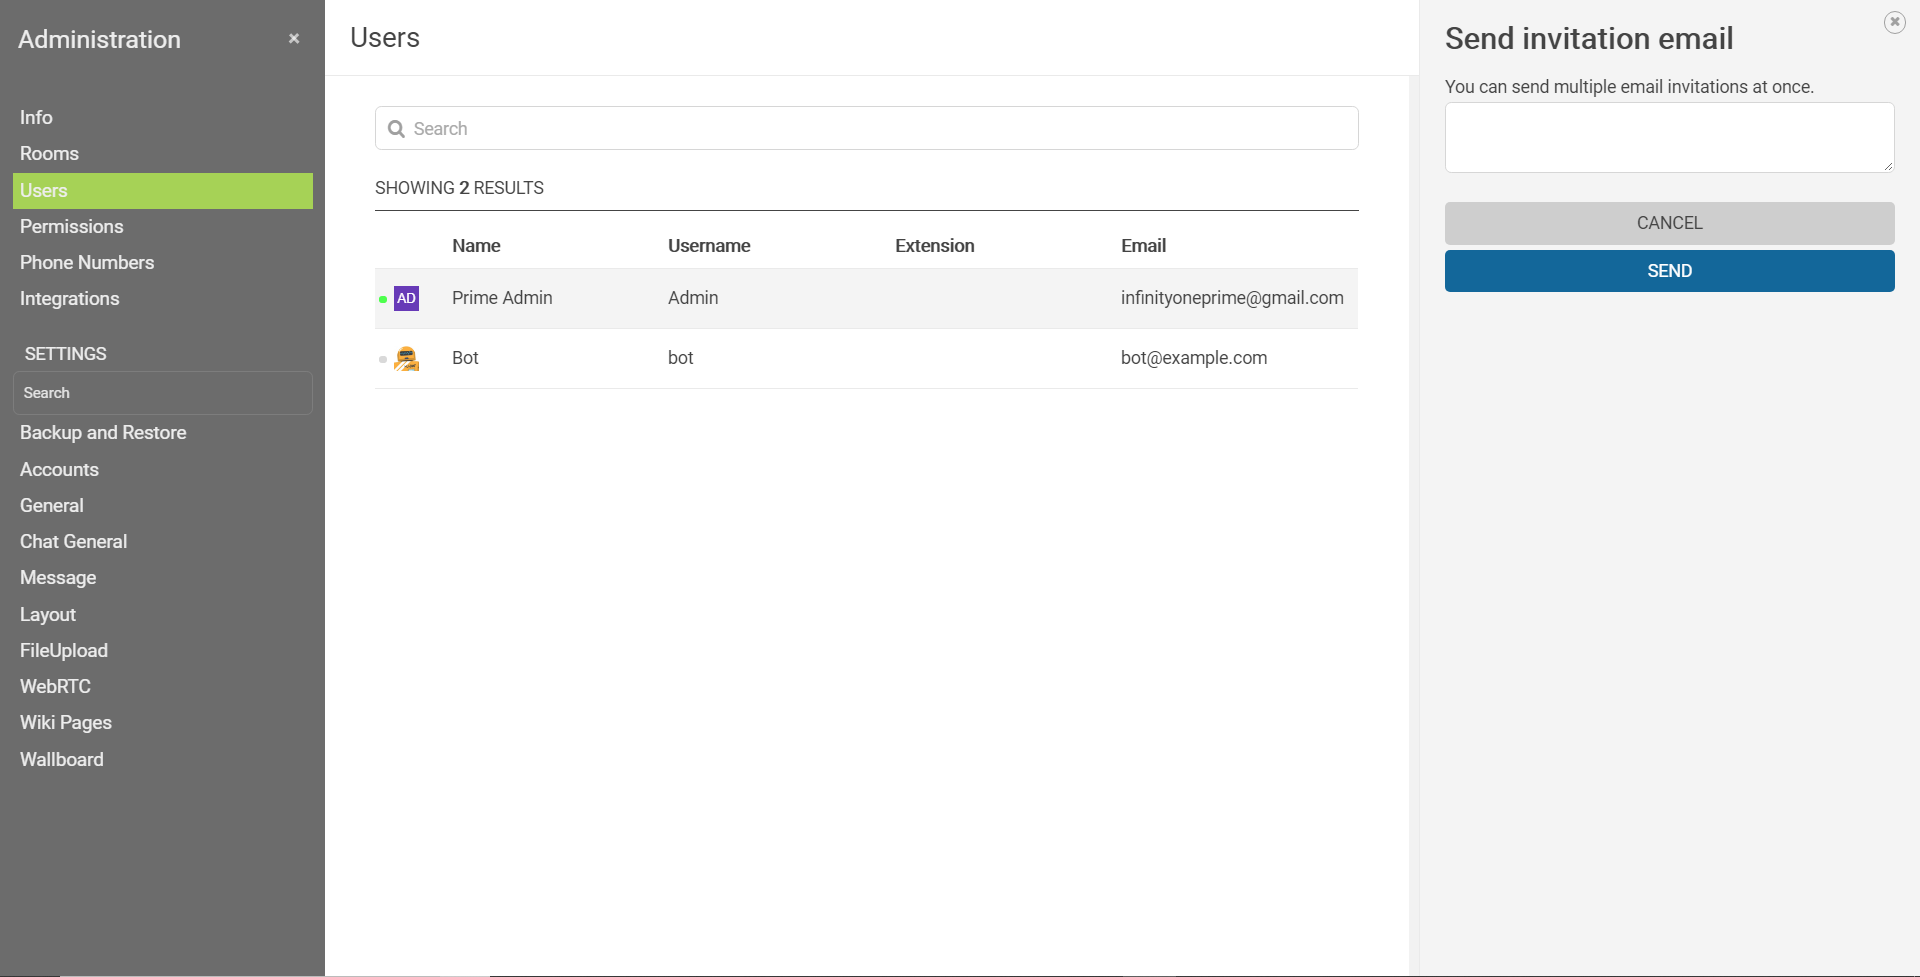
Method 2: By Invitation
Login using the administrator account.
Under Administration -> Users, you will find a Invite Users ![]() icon on the top right corner of the screen.
icon on the top right corner of the screen.
Clicking the icon will take you to a page where you can enter a list of email addresses (separated by a space).
- The system will send out an invitation to each email with a link to register.
- The link will take them to the registration page.
- After registration is complete, the user will receive a confirmation email that must be confirmed by clicking the confirmation link.

Method 3: Add User
Login using the administrator account.
Under Administration -> Users, you will find an Add User  icon on the top right corner of the screen.
Clicking the icon will open up a form for adding the user.
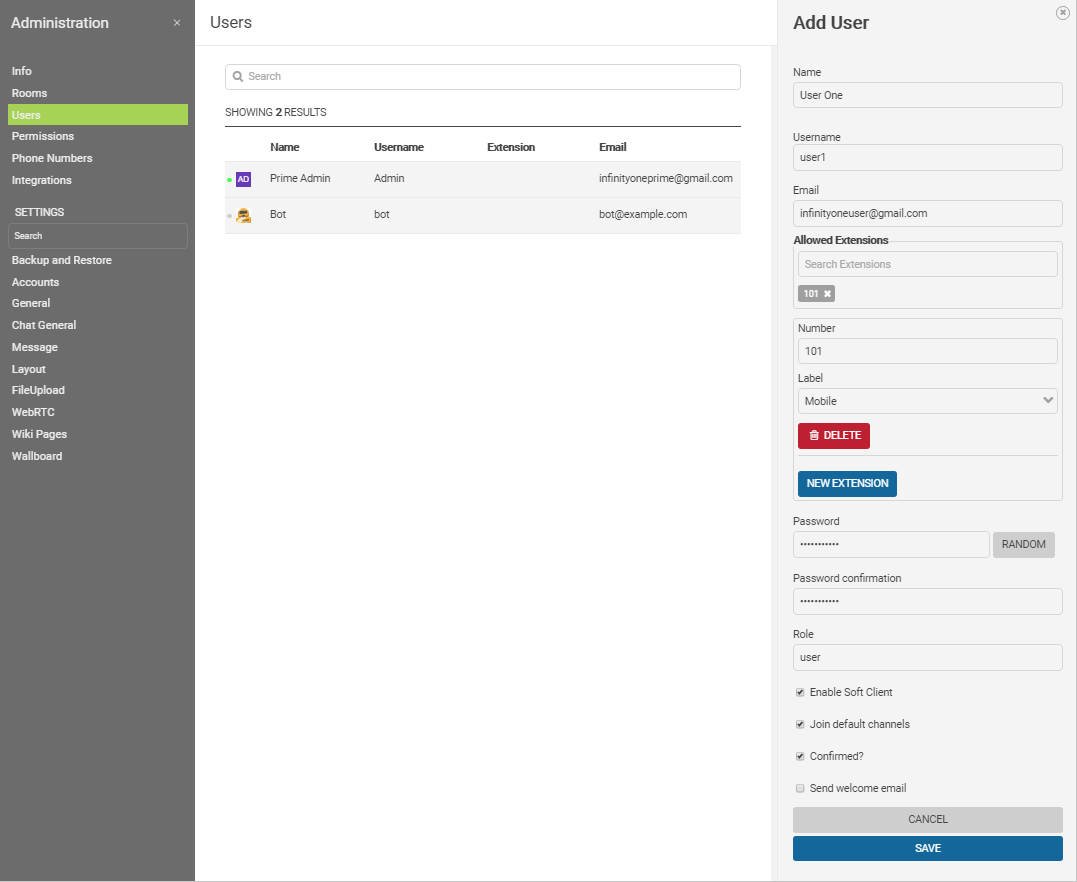
This third method allows you to set the confirmed status and send a welcome email. However, the administrator will need to enter a password (or generate a random password) and communicate the password to the user separately. The advantage of this approach is that you do not have to worry about people finding the invitation and confirmation emails in their spam folder.
| Field | Description |
|---|---|
| Name | User's full name. |
| Username |
User's username (case-insensitive and must be unique).
Username may contain letters, numbers, periods, dashes and underscores, where period cannot be the first or last character. |
| User's email (must be unique). | |
| Allowed Extensions | User's authorized extensions (if they have more than one). |
| Phone Numbers | Provision a User's phone number (extension). |
| Password | User's password. |
| RANDOM button | Create a random password. |
| Password confirmation | User's password again. |
| Role |
User's default role. |
| Enable Softphone | Enable the softphone. |
| Join default channels | Automatically subscribe the user to all configured default channels. |
| Confirmed? | Check so the user does not need to confirm their account if desired. |
| Send welcome email | Send the user a welcome email with a link to the InfinityOne application. |
| CANCEL button | Discard the edits in the form and close the panel. |
| SAVE button | Save the changes. |
Bulk Upload (coming soon)
If you have a large number of user accounts to create, you may also add users through a Bulk Upload of user information compiled in a CSV (Comma Separated Values) based file.
Preparing the CSV file
To use the bulk import capability for InfinityOne Account users, you must create a CSV file with the same type of user information as you would using the Add User method as described above. The possible data fields to use in the CSV file are as follows:
| Header Field | Description | Default Value |
|---|---|---|
| name | User's full name, in the format of "First Last" or "Last, First" | Required in CSV |
| username |
No fixed format if included specifically for a user in the CSV file. If omitted, you must specify if you want to create user names based on the first portion of the email address (before the @ character) or to use First.Last format based on the name field. |
Based on email |
| User's email (must be unique). | Required in CSV | |
| extension | User extension (Optional entry) | None |
| label | The descriptive label associated with the users extension. Choice of Work, Home, Mobile. A blank entry will use the chosen default setting. | Work |
| password | User's password. Can be unique to each user if included for that user in the CSV file. If any password entries are blank, the bulk upload use the portion left of the "@" in email address, or a default password can be identified that will be assigned to all users with a blank password field. | Defaults to user portion to left of "@" in email |
| roles |
Role(s) to be assigned to that user. Multiple roles can be assigned if they are contained within quotes (eg. "role 1, role2" or "role1 role2") |
user |
| enable softphone | If you wish for a user to have their softphone enabled automatically, enter true. If you specifically want a user's softphone to not be enabled, enter false. A blank entry will use the default setting. | true |
| join default channels | To subscribe each user to all configured default channels, enter true. If not, enter false. A blank entry will use the default setting. | true |
| confirm account | If you want some users to automatically be confirmed, enter true. To force a use to confirm their account, enter false. | true |
| send welcome email | To force the sending of a welcome email to a user, enter true. If you want some users to not receive welcome emails, enter false | false |
The structure of the CSV file is as follows:
- First Line: The first line can be a header line using the Header Fields to help organize the data as you create it. If you are using a header line, the field names can be in any order.
- Subsequent Lines: A single line is required for each user. At a minimum the line must contain a name and a unique email for each user, and the remaining settings can be automatically generated based on a combination of those two fields and the chosen default settings.
- Each user's name must be in the format of "First Last" or "Last, First"
- You may enter as many user-data lines as required.
Sample CSV Files
The following are some examples of CSV files:
Example 1.
CSV file:
Name, Email, Extension, Enable softphone
"Test, One", [email protected], 200, true
"Two Test", [email protected], 201,
"Test, Three", [email protected], 202,
Modified Defaults:
Username: "name"
Password: "temp"
Results in the following 3 user accounts:

The usernames are of the form First.Last since the default setting was "name".
The password for each of the three accounts is temp since it was listed as the default.
Example 2.
Name, Email, Password, Extension, Roles, Enable softphone, Send welcome email
"Test, One", infinityoneadmin.gmail.com, C0mpl3xPa55W0rd,200, admin, true, false
"Two Test", [email protected], , guest,false,true
"Test, Three", [email protected], PleaseChange!, user, 201,false,true
Modified Defaults:
none
Results in the following 3 user accounts:

The usernames are based on the user part of the email address since there was no default setting.
The password for username: infinityoneguest is infinityoneguest since it was not explicitly specified in the CSV file.
Example 3
Name, Email, Password, Extension, Roles, Enable softphone, Send welcome email, Join default Channels, Confirmed, Label, Username
"Test, One", [email protected], C0mpl3xPa55W0rd, 200, "admin", true, false, true, true, Work, SecondAdmin
"Two Test", [email protected], ,202, "guest", false, true, false,,Home,
"Test, Three", [email protected], PleaseChange!, 201, "user", false, true,,,
Modified Defaults:
none
Results in the following 3 user accounts:

The usernames are based on the user part of the email address since there was no default setting.
The password for username: infinityoneguest is infinityoneguest since it was not explicitly specified in the CSV file.
The username for "One Test" is SecondAdmin because it was explicitly defined.
Uploading the CSV file
Once you have created your CSV file and identified any desired modifications to the default settings following the description provided here, please contact E-MetroTel support for assistance in the upload.