

Call Recording Options
There are several options available on when and where you want to start recording a call. This section describes each option and how to configure them.
Extension
Each extension has the ability to configure call recording for that extension.
- Open the UCX Web-based Configuration Utility
- From the PBX tab, select PBX Configuration
- From the left side column, select Extensions
- From the list on the right hand side, select the extension that you want to configure Call Recording
- Scroll down to the Recording Options section
Recording options are available for inbound and outbound calls, internal and external calls. If the option is set to Don't Care, then recording can be enabled as required (i.e. On Demand Recording). On Demand Recording is disabled by default.
Record Priority Policy sets the priority of call recording relative to other extensions when there is a conflict between an extension wanting recording and the other not wanting it. The higher of the two determines the policy, on a tie the global policy (default is caller) determines the policy.

On Demand Recording
If on demand recording is enabled, the user can start or stop recording during a call by dialing *1. The feature code value *1 is the default, this value can be changed in the Feature Codes panel.

Nortel phones can be configured with the feature key F989 (select Record Call from the drop-down list) under the Programmable Keys section. The user can start or stop recording by pressing the feature key.

Queue
Within each queue there is the ability to set the recording parameters. It is important to note that these recording parameters supercedes individual user extension recording settings.
- Open the UCX Web-based Configuration Utility
- From the PBX tab, select PBX Configuration
- From the left side column, select Queues
- From the list on the right hand side, select the queue that you want to configure Call Recording
- Scroll down to the General Queue Options section
|
Field
|
Default Value
|
Description
|
|---|---|---|
| Call Recording | No | Enable call recording of calls sent to the queue by selecting the desired recording fornat: WAV, wav or GSM (wav is recommended). |
| Recording Mode | Include Hold Time | Choose when to start the recording: Include Hold Time or After Answered. |

Note that you can also provide agents with the ability to Pause and Resume the recording. This supports privacy/regulatory considerations that prohibit the recording of callers' private information such as credit cards, etc. while the caller is engaged on a queue call that has Call Recording set to record to one of the available formats.
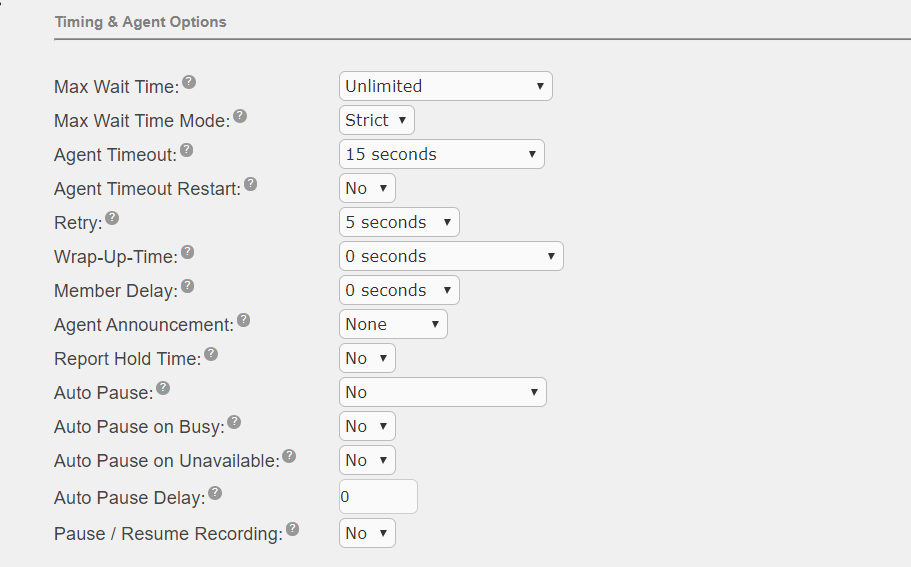
- Scroll down to the Timing and Agent Options section
|
Field
|
Default Value
|
Description
|
|---|---|---|
| Pause / Resume Recording | No | When enabled, an Agent who is handling a call that is being recorded due to the queue or inbound route configuration can use the In-Call Asterisk Toggle Call Recording feature code to pause/resume the recording. Agents can use this option regardless of the state of the On Demand Recording setting for their extension. |
Inbound Route
Each inbound route can be configured to record calls. The Call Recording option controls all calls coming into the DID for the route.
- Open the UCX Web-based Configuration Utility
- From the PBX tab, select PBX Configuration
- From the left side column, select Inbound Routes
- From the list on the right hand side, select the route that you want to configure Call Recording
- Scroll down to the Call Recording section
- Set Call Recording to one of the following values:
|
Call Recording
|
Behavior
|
|---|---|
| Allow | Honor normal downstream call recording settings. This is the default. |
| Record on Answer | Start recording when the call is answered, ignoring any downstream settings that say otherwise |
| Record Immediately | Start recording immediately capturing ringing, announcements, MOH etc. |
| Never | Disallow recording, ignoring downstream settings |

Call Flow
By creating a Call Flow which will define how a call will be handled, the call recording parameters associated with the Call Flow can force a call to be recorded or not recorded based on a call flow and override all other recording settings. If a call is to be recorded, it can start immediately. This will incorporate any announcements, hold music, etc. prior to being answered. It can also have the recording start at the time that the call is answered. Call recording can force a call to be recorded prior to going to a specific destination that does not allow call recordings to be set, such as ring groups, IVR etc.
See Call Recording for configuration and usage details.
