1. Prerequisites
2. Introduction
3. Restrict external dialing for conference room extensions
4. Restrict long distance dialing for certain extensions
5. Restrict long distance dialing to for certain extensions to Canada Only
6. Restrict dialing to specific feature or application for certain extensions
Outbound routes are configured.
Custom Contexts allow dial plan access restrictions to be defined on a per extension or trunk basis. The flow chart below illustrates how custom context is applied.
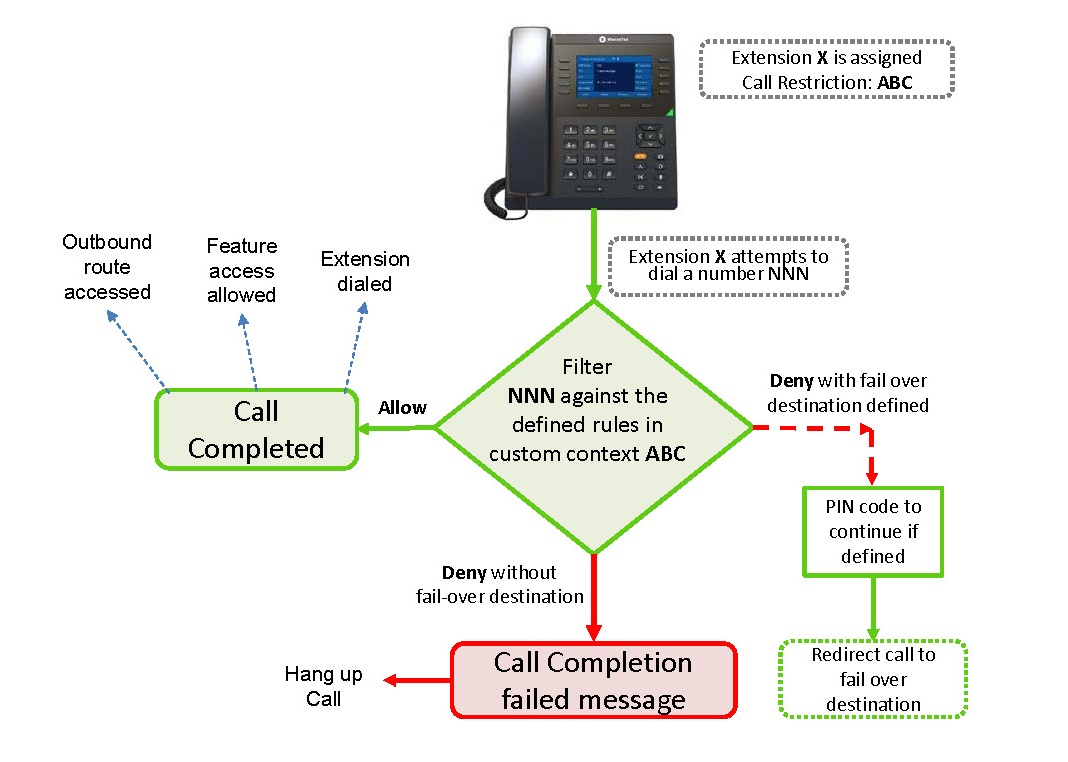
We will use three scenarios to show how access restrictions can be defined for specific extensions using custom contexts.
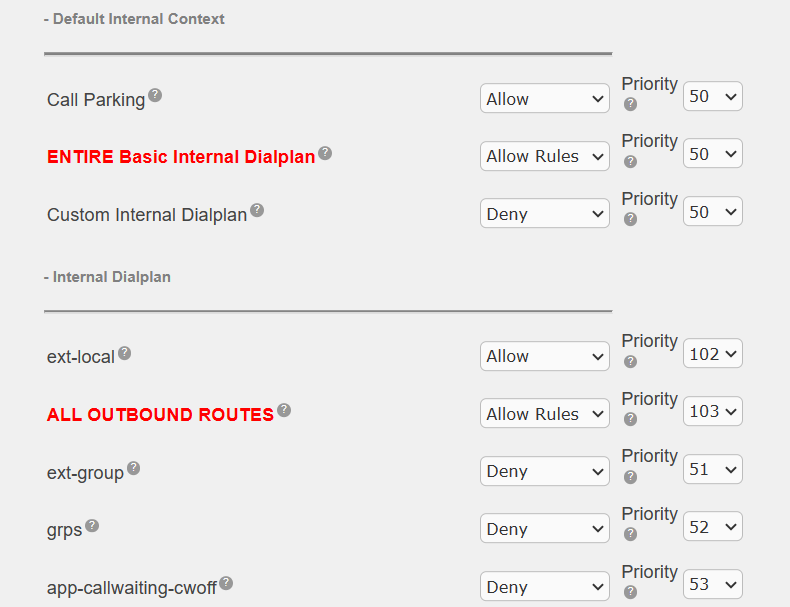
There are two fields in the Custom Context panel that must always be set to the same value for this feature to work. These two fields are highlighted in RED and BOLD:
In this scenario, dial access is restricted by denying access to certain outbound routes.
To add a custom context, perform the following steps:

On the right side column, look for the new context and select it.

The following steps will define what this context allows and denies:

3. Set the field ALL OUTBOUND ROUTES to Deny
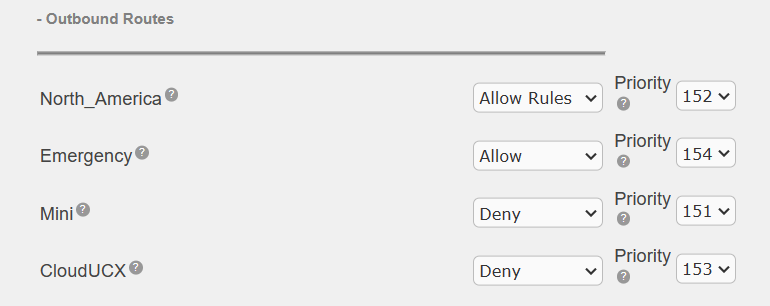
4. All outbound routes that have been configured on the system will be listed under the Outbound Routes section of the panel. Depending on what outbound restriction you want to apply, select Deny for the desired route(s).

5. Press the Submit button to save the changes
Next you proceed to the Extensions panel to assign the custom context. (See Extensions in the Administrative Guide for details on configuring extensions.)
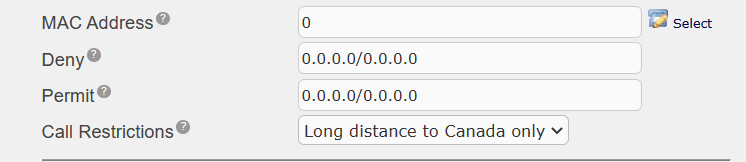
Go to the Call Restrictions field under the Device Options section, the newly created custom context will show up in the pull down list.
Select the desired context and press the Submit button to save the changes.


In this scenario, dial access is restricted by denying access based on dial sequence rules.
To add a custom context, perform the following steps:

On the right side column, look for the new context and select it.
Enter the dialing sequence you want to restrict in the Dial Rules box (e.g. 1NxxNxxxxxx)

The following steps will define what this context allows and denies.

3. Set the field ALL OUTBOUND ROUTES to Deny Rules
4. All outbound routes that have been configured on the system will be listed under the Outbound Routes section of the panel. Depending on which route you want to apply the restriction, select Deny Rules for the desired route(s).

5. Press the Submit button to save the changes
Next you proceed to the Extensions panel to assign the custom context. (See Extensions in the Administrative Guide for details on configuring extensions.)
Go to the Call Restrictions field under the Device Options section, the newly created custom context will show up in the pull down list.
Select the desired context and press the Submit button to save the changes.


In this scenario, dial access is restricted by allowing access based on dial sequence rules and denying all others.
To add a custom context, perform the following steps:

On the right side column, look for the new context and select it.
Enter the dialing sequence you want to ALLOW in the Dial Rules box.
(Note: You have to list all the possible area codes that you want to allow in Canada.)

The following steps will define what this context allows and denies.
Next you proceed to the Extensions panel to assign the custom context. (See Extensions in the Administrative Guide for details on configuring extensions.)
Go to the Call Restrictions field under the Device Options section, the newly created custom context will show up in the pull down list.
Select the desired context and press the Submit button to save the changes.
In this scenario, dial access is restricted by denying access to a specific feature or application under the internal dialplan.
To add a custom context, perform the following steps:
On the right side column, look for the new context and select it. The following steps will define what this context allows and denies.

Next you proceed to the Extensions panel to assign the custom context. (See Extensions in the Administrative Guide for details on configuring extensions.)
Go to the Call Restrictions field under the Device Options section, the newly created custom context will show up in the pull down list.
Select the desired context and press the Submit button to save the changes.
![]()