The Galaxy100 FXS8P is a multi-functional analog gateway offering seamless connectivity for legacy telephones and fax machines connecting to E-Metrotel’s UCx systems. The device offers 8 FXS (station) ports, supporting Caller ID, fax over IP and flexible dial plans. It is ideally suited for small and medium businesses, call centers and multi-location environments that have analog device requirements. The Galaxy100 FXS8P can be located in the same location as the UCx system, or it can be located at a remote site that has an IP connection to the same network as the UCx.

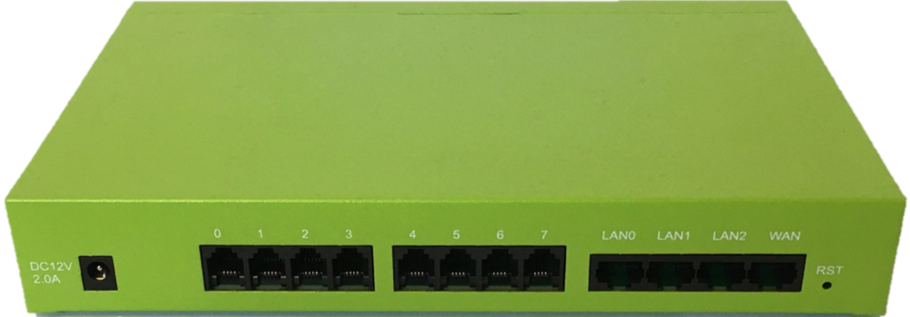
The Galaxy100 FXS8P has eight analog RJ-11 jacks and four Ethernet ports at the rear of the unit. Telephones and fax machines or other analog devices connect via the RJ-11 jacks. Three of the Ethernet jacks are labeled as LAN ports; the fourth is a WAN port.
The front panel consists of indicator lights for Power (PWR), Operational Status (RUN), WAN and LAN (0, 1, and 2) Link and Speed status, and each of the eight FXS (RJ-11) analog ports.
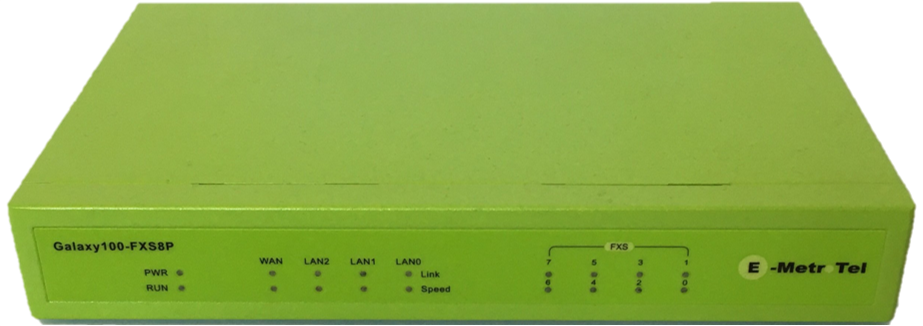
When up and running, the Power LED will be solid and the Run LED will be flashing on the front of the display. At this point the device is ready to be configured for a network connection.
You may connect the Galaxy100 to the network to access the Web Management System with either interface once you have determined either one of the IP addresses associated with the unit. After determining and/or setting one of the addresses, you can set the other address parameters through the Web Management System.
To determine the WAN Interface IP address:
Once verified, you can access the the Web Management System through any device that can communicate with that WAN IP address. See Using the Galaxy100 Web Management System.
Alternatively, if you want to connect to the LAN IP address for configuration, you will need to determine and/or set the address of the LAN ports. You can begin by verifying the currently configured LAN IP address by connecting any analog telephone device to any of the RJ-11 jacks (ports 0 through 7) on the Galaxy100 and dial *158# from the analog phone and the Galaxy100's built-in IVR will announce the LAN IP Address. If this address matches the addressing scheme of the target LAN with no conflicts, then you may connect the unit directly to your LAN and proceed to Using the Galaxy100 Web Management System.
If you are not using DHCP and have a specific LAN IP address that you plan to assign to the unit, you will need to either:
At this point, you are ready to configure the Galaxy100 FXS8P, see Using the Galaxy100 Web Management System..
Enter the IP address of the Galaxy100 FSX8P from a browser window, and login using the default login credentials:

After logging in, the default page is System Information. The Navigation Menu is on the left-side column.

Communication with between the analog devices, the Galaxy100 and the UCx requires three key areas to be configured on the Galaxy100 FXS8P in addition to configuring additional SIP extensions on the UCx server:
These three areas can be access individually by clicking on the entries in the Navigation Menu on the Web Management System screen, or they can be accessed in sequence by clicking on the Quick Setup Wizard entry. Using the Quick Setup Wizard will cycle through these three screens, prompting you to Save after configuring each screen and automatically forward to the next section. After completing the configuration of the three areas, the Galaxy100 FXS8P will indicate that the Quick Setup Wizard is complete and will prompt you to restart the device.
The network parameters of the Galaxy100 FXS8Pcan be modified as necessary using the "Network" tab after clicking "Network" on the Navigation Menu.
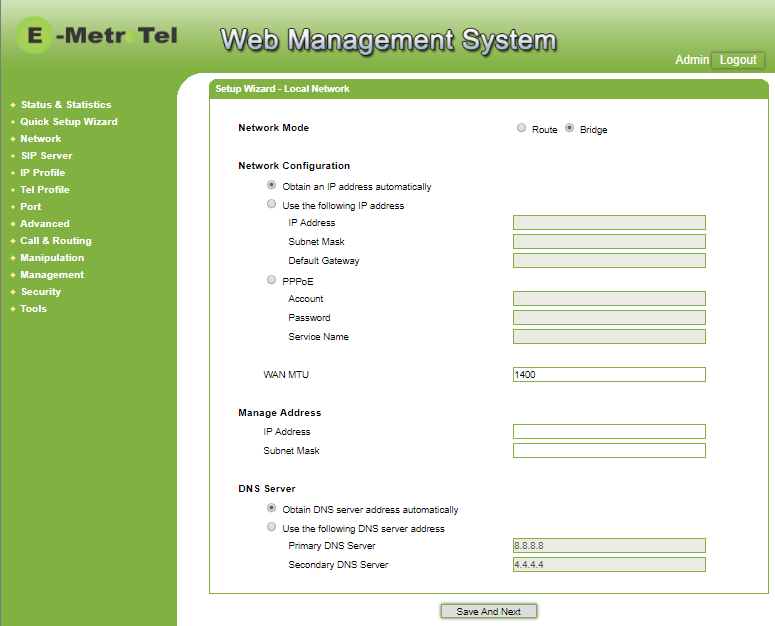
Depending on the topology of your network, you may want the Galaxy100 FXS8P to only use a single IP address. In this case, select "Bridge" mode at the top of the screen. The default is "Route" mode, but "Bridge" mode will cause all four of the Galaxy100 FSX8P's Ethernet ports (WAN, LAN0, LAN1, and LAN2) to share a common IP address.
Edit the other parameters as necessary for your data network configuration.
If you are using the Quick Setup Wizard, you will be prompted to click Save and Next to which will automatically advance you to the SIP Server screen. If you originally navigated directly to the Network screen, the click the Save button to save the changes. The Galaxy100 will indicated the parameters are okay and successfully set with a Back button to optionally return to the Network screen to make additional changes.
If you are not using the Quick Setup Wizard, then navigate to the SIP Server tab and enter the following information:

If you are using the Quick Setup Wizard, you will be prompted to click Save and Next to which will automatically advance you to the Port screen. If you originally navigated directly to the Network screen, the click the Save button to save the changes. The Galaxy100 will indicated the parameters are okay and successfully set with a Back button to optionally return to the SIP Server screen to make additional changes.
If you are not using the Quick Setup Wizard, then navigate to the Port screen and add ports (click the "Add" button) with the following information:

Save the info for each port by clicking the Save button. Repeat until you have all the desired number of ports added by clicking the Add button, and then Save the for each new entry, and the system will return to the Port screen showing a list of all your configured ports. The Add button will only be displayed when there are still port entries available to be configured. You can also use the Back button to modify any of your existing data.

If you are using the Quick Setup Wizard, you will always be presented with a Next button after adding each entry. Once you have configured all the ports you plan to use, clicking the Next button will automatically advance you to a prompt screen indicating that the Quick Startup Wizard is complete. Clicking the Complete button will take you to the Restart prompt screen, at which point you should click Restart to complete the changes.
If you originally navigated directly to the Port screen, there is no Next button. Once you have configured all the ports you plan to use you will be required to navigate to the Device Restart screen by clicking the Tools navigation item. Click Restart to complete the changes.

At this point, you are ready to configure the analog phones as SIP extensions on the UCx server.
Each of the (up to) eight analog devices on the Galaxy100 FXS8P require extensions on the UCX. These are configured as follows:


After all the extensions have been added to the UCx, the Galaxy100 FXS8P devices can begin placing and receiving calls with other users on the UCx.